USBasp - USB programmer for Atmel AVR controllers
About The Programmer
USBasp is a USB in-circuit programmer for Atmel AVR controllers. It simply consists of an ATMega48 and
ATMega88 an ATMega8 and a couple of passive components. The programmer uses a firmware-only USB driver,
no special USB controller is needed.
Features
- Works under multiple platforms. Linux, Mac OS X and Windows are tested.
- No special controllers or smd components are needed.
- Programming speed is up to 5kBytes/sec.
- SCK option to support targets with low clock speed (< 1,5MHz).
Simple Steps to made This programmer
Step 1:-
Download:Firmware and circuit
The following packages include circuit and firmware.
Firmware is the software which going to be burn into programmer's microcontroller, this firmware have code to
enable the programmer to communicate with pc via usb and target microcontroller.
Click This link to dwonload the Firware and circuit
usbasp.2011-05-28.tar.gz (519 kB ) UPDATED, installing and using USBasp.
 |
| Schematic USB AVR Mircrocontroller progammer |
Step 2:-
Buy The parts You need
Part Descirption Qty
ATMEGA8 Microcontroller 1
ATMEGA8 Microcontroller 1
3.6 Volts Zeaner Diode 2
22pf Capacitor 2
100nf Capacitor 1
4.7uf capacitor 1
12Mhz Crystal 1
10K Resistance 1
1K Resistance 3
68ohm Resistance 2
2.2K Resistance 1
LED Led (Red & Geen) 2
USB connector 1
USB Cable 1
3 Way dip switch 1
Step 3:-
PCB and Part Soldering:-
You can create your own pcb using any PCB editor like eagle, OR you can solder the circuit a general purpose
pcb,
Step 4:-
Getting The Atmega8 Microcontroller Ready To be used as a programmer:-
Note:- Make sure you burn the right fuse bit configration along with the firmware into atmega8 microcontroller
for atemega8 the fuse bit are
atmega8 HFUSE=0xC9 LFUSE=0xEF
Step 3:-
PCB and Part Soldering:-
You can create your own pcb using any PCB editor like eagle, OR you can solder the circuit a general purpose
pcb,
 |
| A Genral Purpose PCB |
 |
| USB AVR Programmer PCB Created by Me For your use |
 |
| USB AVR Programmer pcb |
Step 4:-
Getting The Atmega8 Microcontroller Ready To be used as a programmer:-
Getting the atemega8 microcontroller ready to be inserted into the newly soldered pcb ,and start working. you
have to burn the firmware which you just downloaded in the Step 1 into the atmega8 microcontroller. you can use
the serial avr programmer to get this job done. click here to know about how to make a serial avr progammer and
how to program the atmega8 by using a serial avr programmer.
have to burn the firmware which you just downloaded in the Step 1 into the atmega8 microcontroller. you can use
the serial avr programmer to get this job done. click here to know about how to make a serial avr progammer and
how to program the atmega8 by using a serial avr programmer.
for atemega8 the fuse bit are
atmega8 HFUSE=0xC9 LFUSE=0xEF
Step 6:-
Driver installation on a PC:-
At the first time when you connect your programmer to the pc your programmer will be dected as usbaspand you have to provide a proper path for drivers to be installed.
 |
| USB AVR prorammer Dected By the widnows |
 |
| Give the Instruction for a specfic location driver installation |
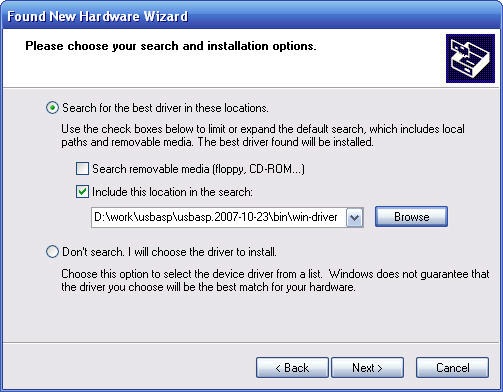 |
| Give the path for driver to be installed |
 |
| USB AVR Programmer installed |
 |
| USB AVR programmer is being connected and shown in device manager |
On Linux and MacOS X no kernel driver is needed.
Windows requires a driver for USBasp: usbasp-windriver.2011-05-28.zip (274 kB)
Note: Windows Vista/7 x64 now support with new driver . update your drive with new one..
Step 6:-
Programming the other microcontrollers:-
You can use any of these software to burn the hex file in to the traget microcontrollers.- AVRDUDE supports USBasp since version 5.2. , (A comand line tool)
- BASCOM-AVR supports USBasp since version 1.11.9.6.
- Khazama AVR Programmer is a Windows XP/Vista GUI application for USBasp and avrdude.
- eXtreme Burner - AVR is a Windows GUI Software for USBasp based USB AVR programmers
Hardware
Schematic
Connections to the traget microcontroller:-
* you can programe many microcontroller by using this schematic , all you need to do is that
find out the data sheet of that mcu you want to program and check the pin configration. and the
look for PIN MOSI MISO SCK and Reset , the connection will be as follows


Connectors
 |
| USB B type female Connector |

 |
| 10 PIN IDC connector (which shown in the schematic) |
You fucking save my life. Thanks so much, cheers from Brazil. :)
ReplyDeletein programmer microcontroller 2,3 pins are connected with 2 pins of IDC connector, what is the use of that here?
ReplyDeletethnx in advance
dear here i have connected 2 and 3 pin in IDC connector because of some time we use the pin Rx and Tx for data transfer to computer serial monitor so it is eaisly get from there....
Delete